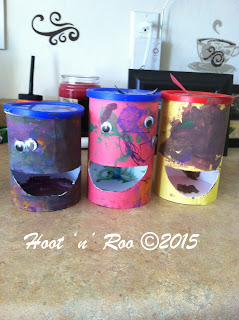
Showing posts with label Halloween. Show all posts

Thursday, November 12, 2015


Mummy Lantern
Builds on: Fine motor skills

What you'll need:
1 empty glass jar
2 large googly eyes
6 (1.5") pieces of tape
white party streamers (about 9" long)
glue
1 tea light candle
What to do:
Show your little how to fold a piece of tape to make a double sided roll of tape (sticky side out) and have them make the remaining 5. Stick one roll of tape to the end of one streamer and attach that to the side of the jar towards the bottom. Have your little wrap the streamer around the jar at an upwards angle. Tape this end to the jar. Start the next streamer just above the start of the first streamer and let your little wrap away. Continue this until the whole jar is covered or until your little feels it looks enough like a mummy. Let your little glue the googly eyes on resisting the urge to straighten them or "fix" them. Place the tea light inside and light it in a dark room or at dinner time for some spooky ambiance. If you'd like to make your mummy a little less tidy you can tear the ends off of your streamers just before taping them and place the tape a little farther from the end so they dangle from the sides a bit like ours did in the picture. 


Monday, September 21, 2015

Spooky Body Art
Builds on: creativity

Using kids body prints to make art is a classic activity that kids love. Not only are they creating art but the whole point is to actually get messy with the paint. How often does that really happen in a kids life?


What you'll need:
black, white and orange paint
large paint brushes
colored paper
glitter glue
fine tipped sharpies
wet wash cloth ( for washing up)

What to do: 

Spider
Put about 1 teaspoon of black paint onto a large paint brush. Have your Roo hold out their hands palm up. Paint the palm and the fingers on one hand, skipping the thumb, and place the palm down firmly on a piece of colored paper. Repeat with the opposite hand careful to line up the palm so it overlaps the first palm print evenly. Wash their hands right away so you don't end up with tiny handprints on everything. 

Once the paint dries use the glitter glue to create the web as shown and a black fine tipped sharpie to write a Halloween greeting.

Pumpkin patch
Choose brown and blue paper. Decide how big you want your patch to be and tear the brown sheet to that size in a straight line. Place about 1 teaspoon of orange paint onto a clean large paint brush. Have your Roo hold out fists this time and paint one from knuckle to first joint. Place them down on your patch firmly and then lift. Paint the fist again to make more pumpkins. Use the wash cloth to to clean their fists. 
Once the paint has dried on the patch use a green sharpie to draw the pumpkin stems and leaves. Use a black sharpie for the greeting.


Ghosts
Choose a black sheet of paper and after placing 1 teaspoon of white paint onto a large clean paint brush paint the bottom of one of your Roos feet. Have them place it down in the middle of your paper and push down on it. Remove and clean with the wet wash cloth. Repeat with the other foot. 

Once the paint is dry use a black sharpie to make 3 large spots that make the eyes and mouths. We used a white crayon to write our greeting. 


We like to include these with our Boo Bags but you can make cards with them to send to family or hang them up to decorate your home.

Tuesday, September 8, 2015

Pumpkin Hammering
Builds on: hand eye coordination, modifying physical force, safety
*This is a supervised activity 


What you'll need:
1 pie pumpkin
1 bag of wooden golf tees
1 child sized wooden hammer
Marker
Safety glasses

What to do:

Use the marker to place dots all around the top part of the pumpkin. Place all but the marker on to the activity table. Make sure everyone is wearing safety glasses before anyone touches anything. Show your Roos how to tap a tee into a dot on the pumpkin using the hammer. Emphasize safety and lay down some safety rules that will end the activity if broken. Then let your Roos have a try with the rest of the tees. There is something about hammers and nails that are just fun for kids. Once they get the hang of it they tend to spend a lot of time hammering in and pulling out tees over and over again.

*While this activity is fun and teaches valuable life skills part of the activity does involve how handle sharp tees and hammers safely. Keep a close eye on the kids to make sure the safety rules you lay down aren't being broken. Learning to use a hammer is just like learning to do anything else so you should expect a mildly banged up finger a few time. They should be tapping fairly lightly because the pumpkin is soft so any injury will be superficial.


Bones Hide and Seek
Builds on: observation and logic
 

What you'll need:
1 large paper skeleton decoration
Skeleton Hiccups by Margery Cuyler

What to do:

I drew my skeleton because I'm a glutton for punishments but you can make your life so much easier by going down to the dollar store and just buying one of those large door skeleton decorations. Dismantle it at the joints then hide the pieces around the house. Make sure that they are totally visible for younger kids and partially visible for older kids.

We read Skeleton Hiccups by Margery Cuyler. When I was finished I told the kids that the skeleton had hiccuped himself to pieces and needed our help to put him back together. Together we found all of the pieces, naming each as we found them, and figured out how they all came together to make a full skeleton. Then kids usually ask to repeat it a few times until it's snack time or someone comes to stop us.

Decorating with spiders

Decorating with spiders
Builds on: Hand eye coordination, fine motor skills and gross motor skills.  

I love how just decorating the house can  elicit so much laughter from kids. It's as simple as a bag of spiders, a bag of cotton webbing and double sided tape from the dollar store.

What you'll need:
1 bag of cotton webbing
1 bag of 100 black and orange spiders
Double sided tape
2 bowls

What to do:
I like to divide the spiders into two bowls equally and set one aside for later before we do anything. After hanging the webbing on the walls and corners of the house outside I give the kids the double sided tape with one of the bowls of spiders and show them how to put the double sided tape on to the bottom of the spiders. Sit with them and help since working with double sided tape can be frustrating.

Once they've all been taped we take to the front door sticking them everywhere. I of course get the high parts while both Hoots and Roos get the middle and lower parts of the door. It doesn't take long for the kids to start giggling because it always seems that about half of the spiders like to pop off once they've been placed. While the kids continue to place spiders I scoop up the escapees and re-tape them for the kids to try again. The extra stubborn ones get set aside for the next part. 


When all of the spiders from the first bowl have been placed on the door it's time for the webs. I generally will place them about 5-6 feet up depending on throwing strength. I place the bowl of spiders on the floor and tell the kids that they have to get all of the spiders to stick. The plastic spiders legs are just thin enough and the webbing is just fine enough that even a weakly thrown spider can stick if it touches. The fun part is watching the spiders fall back down on the kids when they don't stick.

When you're done you have a spooky decorated house that the kids can be proud of.

Skeleton Salt Tray

Skeleton Salt Tray
Builds on: pre-writing skills and exploration 

What you need:

Solid colored plastic serving tray
2 cups of salt
Skeleton cookie cutter
Popsicle stick
Any 2 letter cards
Small basket

What to do:
Pour the salt on to the tray then fill the basket with the popsicle stick, letter cards and cookie cutter. Place everything onto the activities table. Using the popsicle stick show your Roo that they can copy the letters in the salt with it. Step back and watch as your kiddo explores what they can do with what they've been giving.

This is a great quiet time activity for older kids that won't eat the salt or make a mess with the salt.

Pumpkin Drawing and Cleaning
Builds on: creativity, life skills


What you'll need:
Small pumpkins
Washable markers
Wet wash cloth

What to do:
Set out the materials onto your activity table. Let your kids know that it's ok to use the markers to color on the pumpkins; show them how to do it if they seem unsure. After the pumpkins are completely covered you can show them how to use the wash cloth to wipe off all of the marks. 

Let them repeat this for as long as they seem interested and aren't wandering off to color on everything else in the house. 


Felt board Monsters

Felt Board Monsters
Builds on: creativity, confidence and imagination  
I actually got this idea from And Next Comes L for a felt board activity and decided to make some of my own monsters. It was a total hit! Hoots, Roos and even older kids love seeing what kind of monsters they can create together.

What you'll need:
6 different colored sheets of felt
1 sheet of white felt
Black paint pen
Scissors
Felt board

What to do:

Cut out one large monster body shape with arms and legs from each of the colored felt sheets. It's best to have a different shape for each color to make it more interesting for the kids.

Using the white felt cut pairs of different sized shapes for the eyes. Color small solid circles to make the eyeballs as pictured. While those are drying use the left overs of the colored  and white felt sheets to cut out decorative pieces like hair, horns, clothes and teeth. What ever you can think of. 

Spread the pieces out on the felt board or in a bucket near by for the kids to create with. Encourage them to make the monsters any way that they want.  Enjoy some quiet time!

Monday, September 7, 2015


Pumpkin Bowling
Builds on: Hand eye coordination, gross motor and arts


What you'll need:
8-10 Empty food cans
Acrylic paint
Paintbrushes
Card board
Drop cloth
2 small pumpkins

What to do:
Acrylic paint does stain so you should put down a drop cloth first and change everyone into clothes that can get dirty. Place the cans, paint and paint brushes out with a large enough piece of card board for all of the paint you are using. Place a dollop of each colored paint onto the cardboard, hand your kids the paint brushes and let them at it. 

They can paint Halloween characters however they want on the cans but make sure they know that They will be hitting them with pumpkins later on. Roo was appalled when she found out her monster and fairy masterpieces would potentially be destroyed by an onslaught of pumpkins so we ended up using my monster cans instead. Once your cans are all dry, stack them in a pyramid formation or  wall to be knocked down . Place your kids about 6 feet from the cans with a pumpkin and let them roll the pumpkins to knock down the wall. Since smaller pumpkins have bumps and aren't round they'll wander as they roll creating a fun challenge for the kids to overcome. 


*Don't let the kids throw the pumpkins since they could really hurt someone.

Alphabet Monsters

Alphabet Monster
Builds on: fine motor skills, creativity, letter recognition

I love this activity because it's something that can be adapted to your child's growing literacy skills, as well as, helping to build confidence in their own decision making by giving them full creative control over their work. No eyes and crooked eyes are welcome!


What you need:
empty raisin canisters (cleaned)
colored paper
glue
googly eyes
scissors
markers

What to do:
Place all of the materials out on the activity table. Explain that the canister is going to be the monsters head. He'll need eyes and a big mouth to eat lots of letters big and small. Ask the kids what color skin they'd like and pick out that color in paper. Have them help you by putting glue all over the canister so that you can wrap the colored paper around it. You'll need to help them by cutting off some excess paper at the bottom and draw a big open mouth on to the paper to cut out later. 

Have the kids glue their eyes on where they want them and paint or draw features like ears, freckles or hair. Set aside and let dry. Once it's all dried up you can use scissors to cut out the mouth you had penciled in before. 

*I used stencils to make bats, ghosts, spiders and cat shapes, writing a letter of the alphabet on each them for my monsters "food". If you follow my blog I can send you a sheet with these shapes that you can print out to save time.

Sit at the table with your monster and monster food. In a silly deep voice speak for your monster saying " I'm hungry! Feed me!" Have your kiddo pick out a letter and name it together before feeding your monster. Once they get a little better at letter recognitions the monster can ask for a specific letter to eat, challenging your kiddo to find the correct one. Work on letter sounds once they've mastered letters and site words once they start reading. 

Friday, September 4, 2015


Web in the night
Builds on: creativity and fine motor skills


This is an oldy but goody that I remember doing in school as a kid without the cool stickers. Great for Halloween and bug themes; kids really enjoy the spider web reveal in the end and then trying to make their own reveal designs.
What you'll need:
watercolors
a jar of water
paint brushes
white crayon
white paper
foam stickers
What to do:
Use the white crayon to draw a spider web on to the white paper. Because it's white on white it can be hard to see while you're drawing so hold the paper against a window while it's light out to make it easier to see the marks made by the crayon. 
Put everything out on the activity table and tell the kids that there is a something hidden on the paper that can only be seen when they paint the night sky. Let the kids pick their own colors  Once they reveal the first few lines see if they can guess what it is. If they haven't figured out what it is by the time the whole thing is uncovered start giving hints until they finally get it. Halloween paintings get stars, moons and ghost stickers while bug themes painting would get puffy bug stickers once the paint is dry.


This is a great activity to have planned for a babysitter on date night or for a quick family activity just before bed.
 

Give your kids creative license over their own work. If this is how they want night to be look, let it happen and build up their confidence by supporting their choice.

Extra resources:

If you're looking for more activities involving spider webs follow the links to some of these great ideas on our favorite blogs. 

Wednesday, September 2, 2015

Q-tip Painting With Homemade Watercolors
Builds on: fine motor skills, color identification, life skills and creativity

This activity is so easy with very little mess and the kids get excited because they get to help by making the paint.Great for both Hoots and Roos!


What you'll need:
Neon and black food coloring
2 cups cold water
4 empty yogurt cups
thick rag towel
straws for mixing
10 large Q-tips
Jumbo Halloween coloring sheets 


What to do: 

Have the kids pour the water into the 4 empty yogurt cups as evenly as they can. Place the cups onto a thick towel that can get stained and hand over the food coloring. We chose electric green, purple, red and black because they are halloween colors. You can also choose primary colors (red, blue, and yellow) to mix together to make custom colors. Let the kids place between 4-10 drops into the water and stir with the straws. Make picture choices. Then place the pictures, q-tips and your newly made watercolors on to the activities table. Use the q-tip ends as the brush by dipping one end into a color and then making strokes on the picture to transfer the paint. Then just let the kids have fun!

*The more drops of food coloring you use the quicker it will stain surfaces making it less washable.

Tuesday, September 1, 2015

The Pumpkin Patch

Pumpkin Patch
Builds on: hand strengthening, sensory development, vocabulary

 
What you'll need:
1 package of cream filled chocolate cookies- cream removed
1 package of candy pumpkins
A large spoon
Rectangular container
Small cultivator/ hand rake
Toy tractor
What to do:


Place just the chocolate cookies into the container and hand your Roo the large spoon while you inconspicuously dispose of the creamy centers...in your mouth. Just kidding. Sort of. Show your Roo how to use the spoon to crack, smash and crumble the cookies into tiny pieces so that it looks like soil. Place the tractor in the "soil" and the opened bag of candy pumpkins on the side with the small cultivator. You can bury the pumpkins and have your kids dig them out. You can read a story about farming or growing pumpkins and then let them reenact it or you can just set them loose and see what happens. Either way it's a fun activity that will help to strengthen little hands with all the smashing and provide a fun dramatic activity with multiple sensory elements. 

*Don't forget to talk about how it smells, feels and even tastes to help develop the senses and build descriptive vocabulary.