Showing posts with label Arts and crafts. Show all posts

Monday, September 21, 2015

Spooky Body Art
Builds on: creativity

Using kids body prints to make art is a classic activity that kids love. Not only are they creating art but the whole point is to actually get messy with the paint. How often does that really happen in a kids life?


What you'll need:
black, white and orange paint
large paint brushes
colored paper
glitter glue
fine tipped sharpies
wet wash cloth ( for washing up)

What to do: 

Spider
Put about 1 teaspoon of black paint onto a large paint brush. Have your Roo hold out their hands palm up. Paint the palm and the fingers on one hand, skipping the thumb, and place the palm down firmly on a piece of colored paper. Repeat with the opposite hand careful to line up the palm so it overlaps the first palm print evenly. Wash their hands right away so you don't end up with tiny handprints on everything. 

Once the paint dries use the glitter glue to create the web as shown and a black fine tipped sharpie to write a Halloween greeting.

Pumpkin patch
Choose brown and blue paper. Decide how big you want your patch to be and tear the brown sheet to that size in a straight line. Place about 1 teaspoon of orange paint onto a clean large paint brush. Have your Roo hold out fists this time and paint one from knuckle to first joint. Place them down on your patch firmly and then lift. Paint the fist again to make more pumpkins. Use the wash cloth to to clean their fists. 
Once the paint has dried on the patch use a green sharpie to draw the pumpkin stems and leaves. Use a black sharpie for the greeting.


Ghosts
Choose a black sheet of paper and after placing 1 teaspoon of white paint onto a large clean paint brush paint the bottom of one of your Roos feet. Have them place it down in the middle of your paper and push down on it. Remove and clean with the wet wash cloth. Repeat with the other foot. 

Once the paint is dry use a black sharpie to make 3 large spots that make the eyes and mouths. We used a white crayon to write our greeting. 


We like to include these with our Boo Bags but you can make cards with them to send to family or hang them up to decorate your home.

Monday, September 7, 2015


Pumpkin Bowling
Builds on: Hand eye coordination, gross motor and arts


What you'll need:
8-10 Empty food cans
Acrylic paint
Paintbrushes
Card board
Drop cloth
2 small pumpkins

What to do:
Acrylic paint does stain so you should put down a drop cloth first and change everyone into clothes that can get dirty. Place the cans, paint and paint brushes out with a large enough piece of card board for all of the paint you are using. Place a dollop of each colored paint onto the cardboard, hand your kids the paint brushes and let them at it. 

They can paint Halloween characters however they want on the cans but make sure they know that They will be hitting them with pumpkins later on. Roo was appalled when she found out her monster and fairy masterpieces would potentially be destroyed by an onslaught of pumpkins so we ended up using my monster cans instead. Once your cans are all dry, stack them in a pyramid formation or  wall to be knocked down . Place your kids about 6 feet from the cans with a pumpkin and let them roll the pumpkins to knock down the wall. Since smaller pumpkins have bumps and aren't round they'll wander as they roll creating a fun challenge for the kids to overcome. 


*Don't let the kids throw the pumpkins since they could really hurt someone.

Alphabet Monsters

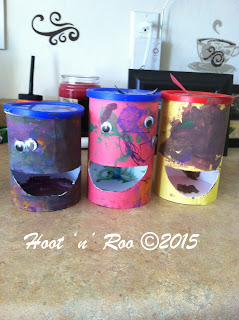
Alphabet Monster
Builds on: fine motor skills, creativity, letter recognition

I love this activity because it's something that can be adapted to your child's growing literacy skills, as well as, helping to build confidence in their own decision making by giving them full creative control over their work. No eyes and crooked eyes are welcome!


What you need:
empty raisin canisters (cleaned)
colored paper
glue
googly eyes
scissors
markers

What to do:
Place all of the materials out on the activity table. Explain that the canister is going to be the monsters head. He'll need eyes and a big mouth to eat lots of letters big and small. Ask the kids what color skin they'd like and pick out that color in paper. Have them help you by putting glue all over the canister so that you can wrap the colored paper around it. You'll need to help them by cutting off some excess paper at the bottom and draw a big open mouth on to the paper to cut out later. 

Have the kids glue their eyes on where they want them and paint or draw features like ears, freckles or hair. Set aside and let dry. Once it's all dried up you can use scissors to cut out the mouth you had penciled in before. 

*I used stencils to make bats, ghosts, spiders and cat shapes, writing a letter of the alphabet on each them for my monsters "food". If you follow my blog I can send you a sheet with these shapes that you can print out to save time.

Sit at the table with your monster and monster food. In a silly deep voice speak for your monster saying " I'm hungry! Feed me!" Have your kiddo pick out a letter and name it together before feeding your monster. Once they get a little better at letter recognitions the monster can ask for a specific letter to eat, challenging your kiddo to find the correct one. Work on letter sounds once they've mastered letters and site words once they start reading. 

Friday, September 4, 2015


Web in the night
Builds on: creativity and fine motor skills


This is an oldy but goody that I remember doing in school as a kid without the cool stickers. Great for Halloween and bug themes; kids really enjoy the spider web reveal in the end and then trying to make their own reveal designs.
What you'll need:
watercolors
a jar of water
paint brushes
white crayon
white paper
foam stickers
What to do:
Use the white crayon to draw a spider web on to the white paper. Because it's white on white it can be hard to see while you're drawing so hold the paper against a window while it's light out to make it easier to see the marks made by the crayon. 
Put everything out on the activity table and tell the kids that there is a something hidden on the paper that can only be seen when they paint the night sky. Let the kids pick their own colors  Once they reveal the first few lines see if they can guess what it is. If they haven't figured out what it is by the time the whole thing is uncovered start giving hints until they finally get it. Halloween paintings get stars, moons and ghost stickers while bug themes painting would get puffy bug stickers once the paint is dry.


This is a great activity to have planned for a babysitter on date night or for a quick family activity just before bed.
 

Give your kids creative license over their own work. If this is how they want night to be look, let it happen and build up their confidence by supporting their choice.

Extra resources:

If you're looking for more activities involving spider webs follow the links to some of these great ideas on our favorite blogs. 

Wednesday, September 2, 2015

Q-tip Painting With Homemade Watercolors
Builds on: fine motor skills, color identification, life skills and creativity

This activity is so easy with very little mess and the kids get excited because they get to help by making the paint.Great for both Hoots and Roos!


What you'll need:
Neon and black food coloring
2 cups cold water
4 empty yogurt cups
thick rag towel
straws for mixing
10 large Q-tips
Jumbo Halloween coloring sheets 


What to do: 

Have the kids pour the water into the 4 empty yogurt cups as evenly as they can. Place the cups onto a thick towel that can get stained and hand over the food coloring. We chose electric green, purple, red and black because they are halloween colors. You can also choose primary colors (red, blue, and yellow) to mix together to make custom colors. Let the kids place between 4-10 drops into the water and stir with the straws. Make picture choices. Then place the pictures, q-tips and your newly made watercolors on to the activities table. Use the q-tip ends as the brush by dipping one end into a color and then making strokes on the picture to transfer the paint. Then just let the kids have fun!

*The more drops of food coloring you use the quicker it will stain surfaces making it less washable.